Thursday, January 27, 2011

Len & Trudy's 65th Anniversary

January 15, 2011


This is a bit out of order but my first real job for the year was photographing Len and Trudy's 65th anniversary celebration. Can you imagine being with someone for that long? And they were still so lovey and happy. And still looking GOOD! It was basically a nice evening out at the Thousand Oaks Country Club with their three kids, their spouses, all their grandkids and their spouses. It was a nice quiet evening and Len and Trudy were good sports with all the smiling I made them do for the group shots. Just a few for you to check out below.


 ^The whole family together! They were great to work with!

^The reason I did this event was Dale (on the far right) is the VP of the company I work for and his wife (far left) wanted someone there to capture the evening. Thanks Dale and Mary Jo!

Wednesday, January 26, 2011

Brandon & Whitney: An Engagement

January 23, 2011


When planning a winter photography session, you have to be a little leary of Mother Nature. The day before I met Brandon and Whitney, she dumped a fine blizzard on pretty much the entire state! But on Sunday, even though we never got the mercury above 15 degrees (brrrrrr!!!), she gave us a bright and sunny day with lots of blue sky and color. Not always the best situation for photographing... but never a problem if you know some locations with shade!

Whitney and Brandon chose me as their wedding photographer for their September wedding because her cousin, Monica, found me first! And so far she hasn't smacked me for calling her by her cousin's name, so I think we're definitely becoming fast friends! Brandon and Whitney showed up at my door in their warm peacoats, ready to face the freeze!

We started out in a location one of my brides from last year turned me on to, a little park next to the Grand Rapids Veteran's Home. There was at least a foot of snow for us to trek through, but Brandon and Whitney were good sports, and didn't even make fun of me when I ended up laying in the snow to try to get a silhoette shot (it didn't work exactly as planned, but not bad! Check it out below).

Whitney's idea for her engagement session was to do a country-to-city theme, as that's how she and Brandon have been living these days. They are from a small town in mid Michigan (actually, right next to my hometown!) and recently moved to Holland. So we finished off our chilly engagement session by swinging over to downtown GR's Calder Plaza and the awesome photo spot behind the Amway Grand Hotel.

It was great to meet you, Brandon and Whitney. I am definitely looking forward to working with you too again, and in warmer weather as well. Enjoy your photos!


 ^Some climbing was involved for this shot... what a brave couple of mine!


^This is the one that I ended up on the ground for. I couldn't quite place the sun, but it still looks pretty cool!

^A cute little kick-kiss :-)


^This one is so cute!!! I love it, one of my faves.

^City time! Hanging out by the Calder statue.


^This got a little perilous because of the slippery snow, but they pull through it!


^I love how she's on her tip toes to give Brandon a kiss!

 ^Okay, so this is the same shot as the last one, but it's a great way to end it!

Tuesday, January 25, 2011

Bride's Choice Awards 2011

Thank you... Again!!!

For the THIRD year in a row, WeddingWire has done me the pleasure of awarding Jenna Rose Photography the Bride's Choice Award! But the REAL thanks goes to all my wonderful brides and grooms, who took the time to review my work from their wedding. I absolutely LOVE my job, and I love all my amazing clients. Thank you guys... again!!!

WeddingWire Bride's Choice Awards 2011

Grand Rapids, MI – January 25, 2011 - WeddingWire, the nation’s leading wedding technology company, is thrilled to announce Jenna Rose Photography has been selected to receive the prestigious annual WeddingWire Bride’s Choice Awards™ 2011 for wedding photography!

Recognition for the Bride’s Choice Awards™ 2011 is determined by recent reviews and extensive surveys from over 750,000 WeddingWire newlyweds. Our past clients are among those that shared their experiences on WeddingWire, the largest wedding review site in the nation.

Jenna Rose Photography stands among the top five percent of wedding professionals in the WeddingWire community, representing quality and service excellence within the wedding industry. Awards were given to the top wedding professionals across 20 service categories, from wedding venues to wedding photographers, and were based on the overall professional achievements throughout the past year.

“WeddingWire is honored to celebrate the success of the top-rated wedding professionals within the WeddingWire community,” said Timothy Chi, WeddingWire’s Chief Executive Officer. “With the annual Bride’s Choice Awards™ program, WeddingWire has the unique opportunity to recognize the best wedding professionals across the US and Canada. We applaud Jenna Rose Photography for their professionalism and dedication to enhancing the wedding planning experience last year.”

We are happy to announce that Jenna Rose Photography is among the very best in wedding photography within the WeddingWire Network, which includes leading wedding planning sites WeddingWire, Martha Stewart Weddings, Project Wedding and Weddingbee. We would like to thank our past clients for nominating us to receive the Bride’s Choice Awards™ 2011.

For more information, please visit our WeddingWire Storefront today by clicking here.

For more information on the Bride’s Choice Awards™ 2011, please visit www.WeddingWire.com.

Monday, January 17, 2011

The Cupcake Project

Cornelli Cakes

Oh jeez, I got myself a new cupcake book recently and man, I hate to say that this isn't my best entry... The book is cool, it has so many decorating possibilities. It's unlike the one by Pamela Clark in that instead of the more gourmet and fancy tastes you will be getting, "Hello, Cupcake!" by Karen Tack and Alan Richardson, focuses on the fun and exciting decorative techniques you can master. The long and short of it... I may need some practice.

I made up this recipe from various things I've wanted to do. I wanted to employ the dipping technique from "Hello Cupcake" (which worked very well, I was surprised!) and a piping pattern called the cornelli, which I'd tried before and done well, however, it didn't work out as well thing time around.

Anyway, the cakes were good, made from a standard vanilla cupcake recipe from "Hello, Cupcake!" Take a look! And also, take a peak at my new logo (yes, still working on it...) by the wonderful Kristin Huyck! The official reveal will be soon!
 
^The recipe as found in "Hello, Cupcake!" by Karen Tack and Alan Richardson... full of fun ideas!


^All the ingredients lined up and ready. First you mix the dry ones together, flour, baking soda, baking powder, and salt, in a medium bowl. Then mix a few of the wets together, milk, vanilla, and vegetable oil (I had to cut my recipe in half because I didn't realize I was out of oil!) in a separate, small bowl.

^And in a final medium bowl, beat the sugar and butter together. Then beat in each egg separately, finishing by alternately adding the dry and wet mixes, starting and finishing with the dry. Why? Not sure...

^And there you have some batter! I split the recipe, as I mentioned but didn't realize it's hard to split 3 eggs in half... I put two in, it seemed to come out all right.

^A new trick the book suggested was using large zipper bags as batter dispensers. It was easier to get an even cupcake and to drip less. That was until the end... squeezing out that last bit of batter was tricky, so beware!

^The vanilla cupcakes baked about 15 minutes and came out beautifully and perfectly rounded! I don't know why, maybe filling up only 2/3 of the cup is really the perfect amount.

^Now I usually make my own frosting, but for the dipping techinique, the book called for the store bought frosting. I chose cream cheese flavor because vanilla is just too boring!

^Frost the cupcake and make sure to mound the frosting on top. Placing a big glob of frosting in the middle and then smoothing out the edges worked perfectly.

^It probably wasn't necessary for this type of dipping, but I put the cakes in the fridge to cool them down so the frosting already mounded on wouldn't melt with the warmed up frosting.

^The book called for a microwavable measuring cup to use for the dipping frosting, but since I was only doing these small cakes, I chose a much shallower container. Less waste!

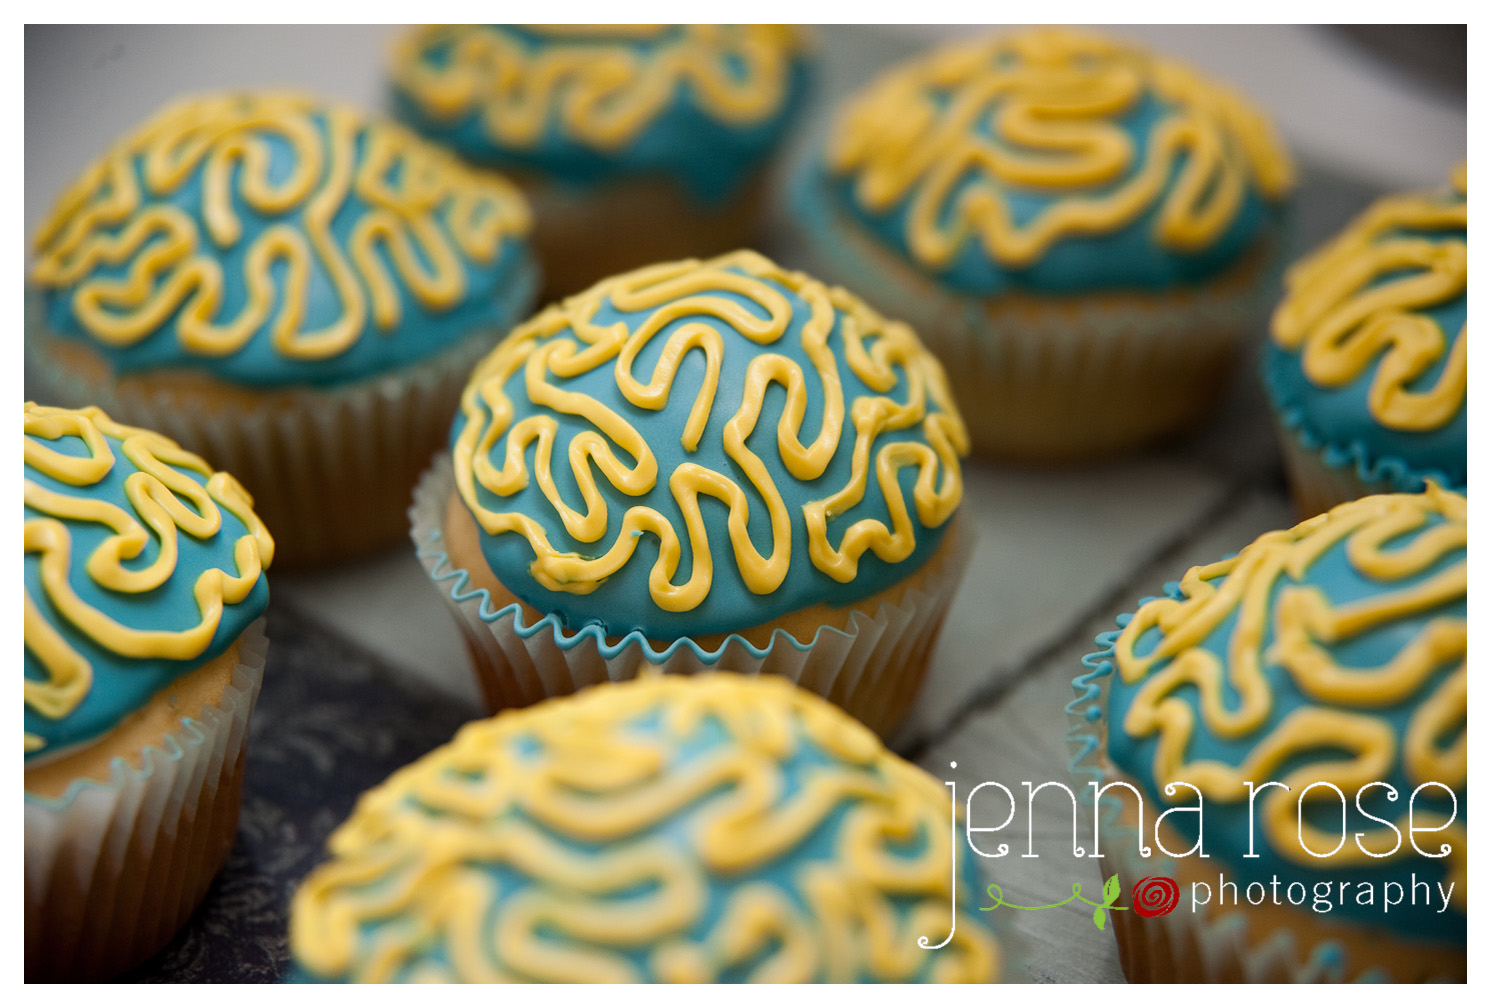
^I went with a blue color for the dipping frosting. You can use any. I was going to go for purple but I'm afraid mixing the colors instead of having a purple food coloring might cause some weird brown. Playing it safe this time.

^Put the frosting in the microwave for 5 to 10 seconds. Stir. If it hasn't melted to the right consistency, do another 5 to 10 second increment. The frosting should coat a spoon dipped in it, but hold the shape of a line you draw across the spoon through the frosting with your finger. Took me two increments of 10 seconds to get it right.

^Dip the cake up to the liner in the melted frosting, make sure to get the whole top covered!

^When I pulled mine out, I tried to roll them a bit to the side to catch the excess dripping. You can probably let it drain a little bit longer. Pop any bubbles with a tooth pick.

^I dipped each cake twice, to get a little extra frosting on them. The melted frosting coats pretty nicely and cools down to the perfect consistency, just nice a smooth!

^My warning to you is to HOLD ON TO THE CAKES TIGHTLY! My first one fell out of my hand and into the blue frosting... Oops! I ate the one later ;-)

^Last, tint the frosting you want to use for piping the cornelli pattern. I went with yellow to contrast the darker blue.

^Turn the bag inside out with your hand and scoop the frosting into it. This was a pretty nifty trick!

^Invert the bag back to it's proper orientation and you have a homemade piping bag! Try to squeeze the air to the top so you can hold only the frosting in your hand. Cut just a TINY bit of the tip off. You want a round hole, which I had a bit of trouble with getting. The cornelli pattern doesn't work well when the frosting has a flatter shape as it comes out. Test out your bag a little before you take it to the cakes!

^The pattern consists of twisting and turning lines over the surface of the cupcake. You don't have to do one completely continuous line, althought that's what I did on all but one of them. It's a little tricky, so get some practice (I still need some myself!).

My photo
Capturing moments, creating memories.